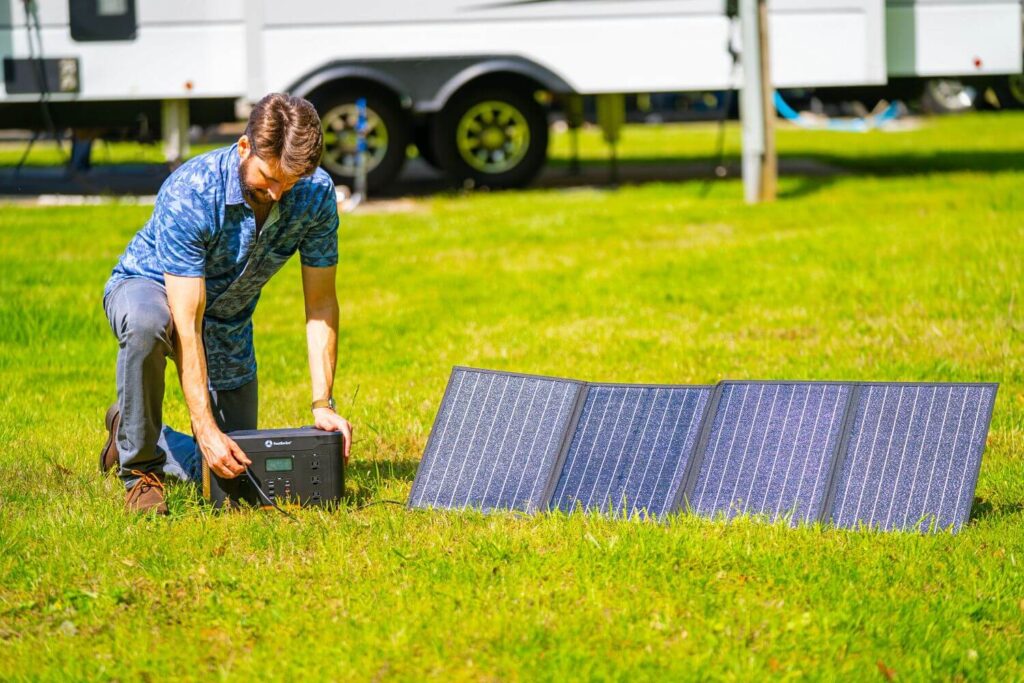
Solar power is the most practical path to true independence on the road. With the best solar panel kits for rvs, you can recharge batteries quietly, skip shore power at expensive campgrounds, and extend how long you can boondock without a generator. The main benefits are energy independence, lower campground bills, quieter boondocking (no generator noise), and a much longer off-grid range when you plan correctly.
Typical RV electrical loads and simple daily watt-hour examples (real-world values vary widely by appliance and usage):
-
LED cabin lights — 4 bulbs × 8 W each × 5 hours = 160 Wh.
-
RV refrigerator (average cycling load) — ~40 W equivalent × 10 hours = 400 Wh.
-
Water pump — 45 W × 0.5 hour = 23 Wh (≈22.5 Wh).
-
Phone charging — 2 phones × 10 W × 3 hours = 60 Wh.
-
Laptop — 60 W × 4 hours = 240 Wh.
Those items add up to roughly 883 Wh/day in this example — under 1 kWh — which is a realistic baseline for light-to-moderate off-grid use. If you run air conditioning, electric cooktops, or heavy loads, your needs will jump dramatically and require much larger arrays and battery banks.
A brief note on batteries and controllers: AGM (lead-acid) batteries are cheaper up-front but heavier, have lower usable capacity, and shorter cycle life than lithium (LiFePO₄) batteries. Lithium batteries accept higher charge currents and deeper discharges, so they pair best with MPPT charge controllers and denser solar setups. Choosing the right panel type, array size, and an MPPT controller (versus PWM) matters because it determines how efficiently your solar harvest turns into usable battery energy for true off-grid living.
How to Choose the Right Solar Kit for an RV
Choosing the best solar panel kits for RVs begins with understanding how much energy you use, how much roof space you have, and how each component—panels, charge controllers, inverters, and batteries—fits together. Below is a step-by-step breakdown to help you make the right decision for your off-grid setup.
Calculate Your Daily Energy Needs
Before buying any solar kit, determine how much power you consume in a typical day. This helps you size your solar array and battery bank accurately.
Step 1: List Your Devices
Write down every device you plan to power — lights, fridge, water pump, fan, laptop, phone, etc.
Step 2: Find Wattage and Usage Time
Use the watt rating printed on each appliance and estimate how many hours per day you use it.
Example 1: Small RV (Weekend Camper)
-
LED lights (4 × 8W × 4 hrs) = 128 Wh
-
Water pump (45W × 0.5 hr) = 23 Wh
-
Mini fridge (50W × 6 hrs) = 300 Wh
-
Laptop (60W × 2 hrs) = 120 Wh
-
Phones (10W × 3 hrs × 2) = 60 Wh
Total = ~631 Wh/day (~0.63 kWh)
Example 2: Full-Time Off-Grid RVer
-
Lights (8 × 8W × 5 hrs) = 320 Wh
-
Fridge (60W × 10 hrs) = 600 Wh
-
Water pump (45W × 1 hr) = 45 Wh
-
Fans (40W × 6 hrs) = 240 Wh
-
Laptop (60W × 4 hrs) = 240 Wh
-
Misc. electronics & inverter loss = ~300 Wh
Total = ~1,745 Wh/day (~1.7 kWh)
If you get about 5 hours of strong sunlight per day, divide total daily watt-hours by 5 to estimate needed solar wattage.
-
Small RV: 630 Wh ÷ 5 = 126W array → choose a 200W kit for safety.
-
Full-timer: 1,745 Wh ÷ 5 = 349W array → choose a 400W+ kit.
Roof Space and Panel Footprint
Your RV’s roof size limits how many panels you can install.
-
Measure total usable roof area (excluding AC units, vents, and antennas).
-
A standard 100W panel is roughly 47″ × 21″; a 200W panel can be around 54″ × 24″.
-
Factor in spacing for wiring and mounting brackets.
Tilt vs. Flat Mounting:
-
Tilt mounts increase efficiency (up to 20–30% gain) when you adjust for the sun’s angle, but they add wind drag and require manual setup.
-
Flat mounts are simpler, lower-profile, and safer while driving but capture less energy in low-sun conditions.
Panel Type: Monocrystalline vs. Polycrystalline vs. Bifacial
| Type | Efficiency | Cost | Weight | Best For |
|---|---|---|---|---|
| Monocrystalline | High (18–23%) | Medium–High | Light | Most RV kits |
| Polycrystalline | Moderate (15–17%) | Lower | Heavier | Budget builds |
| Bifacial | Highest (up to 25%) | High | Moderate | Portable or ground-deploy setups |
Tip: Monocrystalline panels are the best all-around choice for RVs due to high output per square foot — crucial when space is limited.
Fixed Rooftop vs. Portable/Foldable Panels
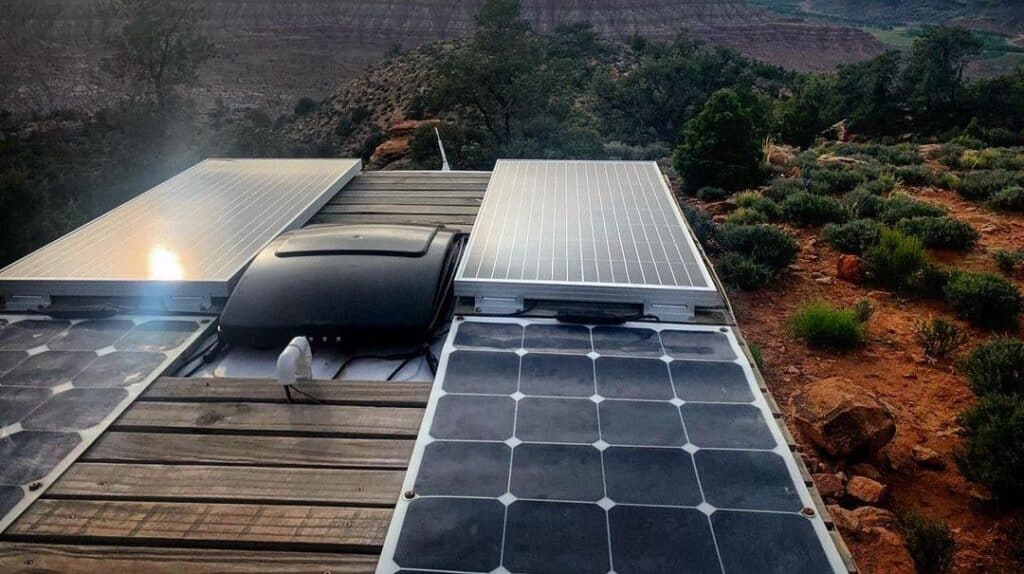
Fixed Rooftop Panels
-
Pros: Always charging, no setup needed, secure while driving.
-
Cons: Harder to tilt or reposition, installation required.
Portable/Foldable Panels
-
Pros: Flexible placement for maximum sun exposure, easy to pack and store.
-
Cons: Manual setup each time, risk of theft, limited output if left in shade.
Hybrid setups (rooftop + portable panel) give you flexibility — roof panels maintain baseline charging while portables top off your battery when parked.
Charge Controllers: PWM vs. MPPT
Your charge controller regulates current between the panels and battery.
-
PWM (Pulse Width Modulation): Cheaper, simpler, but wastes potential energy, especially in partial sun or cold conditions.
-
MPPT (Maximum Power Point Tracking): 20–30% more efficient and ideal for lithium batteries or larger systems.
If your budget allows, always choose MPPT for long-term efficiency — it pays for itself in better energy yield.
Inverter & Battery Compatibility
The inverter converts DC (from solar) to AC (for appliances).
-
Sizing: Add up your total AC load (in watts) and choose an inverter rated 25–50% higher.
-
Battery Chemistry:
-
AGM/lead-acid: affordable, but only ~50% usable capacity.
-
Lithium (LiFePO₄): lighter, 80–90% usable capacity, and charges faster — the best match for modern solar kits.
-
Tip: Match voltage — if you’re using a 12V battery bank, ensure panels and charge controller are compatible with 12V output.
Expandability and Warranty
A good solar kit should allow future upgrades:
-
Check if the charge controller has spare capacity (e.g., 40A controller can support up to ~520W at 12V).
-
Modular wiring and MC4 connectors make adding more panels easier.
-
Look for 25-year panel warranties and at least 1–2 years on electronics.
Quick RV Solar Buying Checklist ✅
-
Calculate daily watt-hour needs accurately.
-
Measure roof space and layout.
-
Choose monocrystalline panels for efficiency.
-
Decide on rooftop, portable, or hybrid setup.
-
Go for an MPPT controller if possible.
-
Match inverter size and battery chemistry.
-
Check for future expandability and warranty coverage.
With this framework, you can confidently choose the best solar panel kit for your RV, ensuring reliable off-grid power wherever the road takes you.
Our Top 5 Picks: Best Solar Panel Kits for RVs
After evaluating performance, portability, and long-term reliability, these are the best solar panel kits for RVs in 2025. Whether you’re a weekend traveler or a full-time boondocker, these five products cover every budget and setup type—from simple starter kits to high-efficiency portable systems.
#1 — Renogy 200W 12V Monocrystalline Solar Panel Starter Kit (2 × 100W panels)

Renogy’s 200W 12V Monocrystalline Solar Panel Starter Kit is one of the most trusted entry-level setups for RVers and van lifers. Designed for powering essentials like lights, fans, water pumps, and small electronics, it balances affordability, reliability, and performance for anyone beginning their off-grid journey.
Key Specifications
- Wattage: 200 W (2 × 100 W panels)
- Controller: 30A PWM (upgradeable to MPPT)
- Output Voltage: 12 V
- Installation: Fixed or semi-permanent rooftop mount
- Weight: ~27 lbs per panel
- Best For: Beginners & small to mid-sized RVs
Pros
- Reliable and efficient entry-level solar kit
- Expandable with extra panels or MPPT upgrade
- Pre-drilled holes and brackets for easy mounting
- Durable aluminum frame and tempered glass
- Renogy’s excellent customer support & compatibility
Cons
- Basic PWM controller (less efficient than MPPT)
- Needs extra fuses and wiring for full setup
- Not as portable as foldable solar panels
#2 — Renogy 400W 12V Premium Solar Kit (4 × 100W panels + MPPT controller)
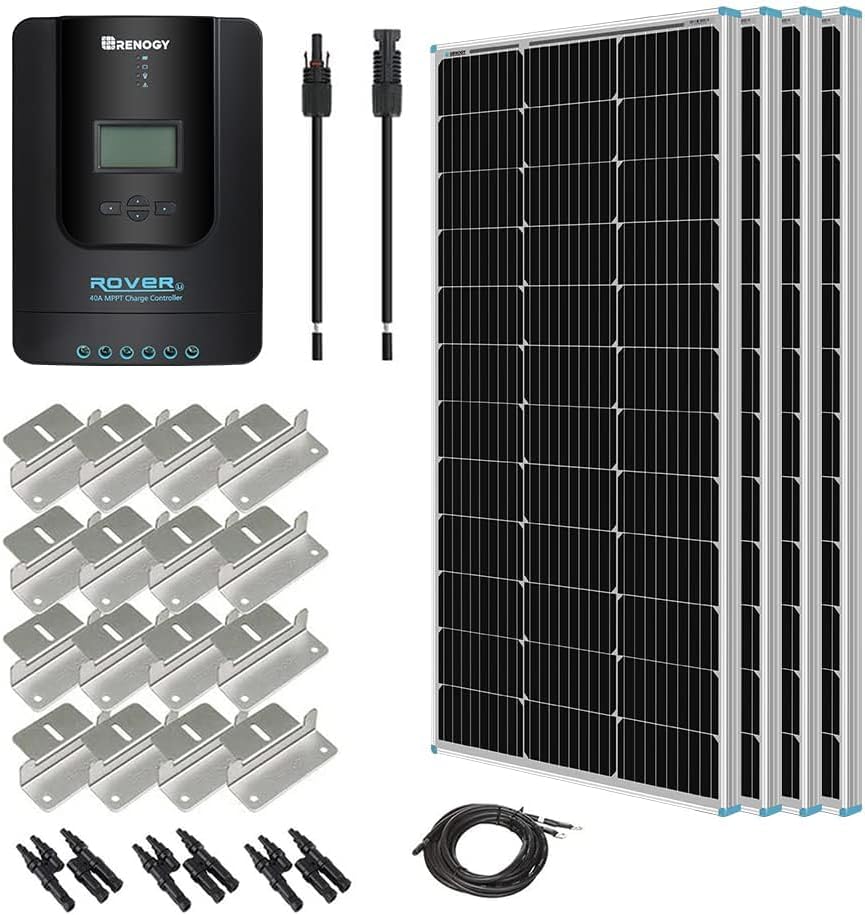
Renogy’s 400W 12V Premium Solar Kit is built for serious off-grid users and full-time RV travelers. Featuring four 100W monocrystalline panels and a 40A MPPT controller, it delivers efficient, consistent power — perfect for running appliances like fridges, fans, laptops, and lights, even in partial shade.
Key Specifications
- Wattage: 400 W (4 × 100 W panels)
- Controller: 40A MPPT charge controller
- Output Voltage: 12 V
- Installation: Fixed rooftop setup
- Weight: ~54 lbs total (panels only)
- Best For: Full-time off-grid RV living
Pros
- MPPT controller maximizes solar harvest efficiency
- Powerful enough for fridges, fans, laptops & more
- Performs well even in partially shaded conditions
- Includes brackets, fuses & full wiring kit
- Renogy’s proven quality with 25-year panel warranty
Cons
- Higher upfront investment than basic kits
- Requires more complex installation process
- Large footprint not ideal for compact RV roofs
#3 — Zamp Solar Legacy Series 180-Watt Portable Solar Panel Kit

Zamp’s Legacy Series 180W Portable Solar Panel Kit is a premium plug-and-play solution for RV owners who prefer flexible, ground-deployable solar power. With an integrated 15A controller and RV-ready SAE plug, it offers hassle-free setup and reliable energy for frequent travelers.
Key Specifications
- Wattage: 180 W monocrystalline
- Controller: 15A integrated charge controller
- Output Voltage: 12 V
- Design: Foldable suitcase-style with adjustable kickstand
- Weight: ~40 lbs (including case)
- Best For: RVers who move frequently or prefer ground deployment
Pros
- Ready to use out of the box — plug-and-play design
- Adjustable kickstand for optimal sun angle
- Integrated charge controller simplifies setup
- Durable construction with carrying case included
- Made in the USA; compatible with most RVs
Cons
- Bulky when folded — requires significant storage space
- Limited expandability beyond 180 W
- Pricier per watt compared to fixed roof kits
#4 — Jackery SolarSaga 200W Portable Solar Panel

The Jackery SolarSaga 200W is a sleek, foldable, bifacial solar panel designed for seamless use with Jackery Explorer power stations. Lightweight, durable, and water-resistant, it’s perfect for RVers and campers relying on portable solar generators.
Key Specifications
- Wattage: 200 W (bifacial monocrystalline)
- Controller: None included (uses power station’s MPPT)
- Output Voltage: 18 V (varies by model)
- Design: Foldable with carry handle & kickstand
- Weight: ~17.5 lbs
- Best For: Portable setups & solar generators
Pros
- Quick plug-and-play setup with Jackery power stations
- IP68 water-resistant and dustproof rating
- Bifacial technology captures reflected light for added efficiency
- Lightweight and travel-friendly design
- Durable with reinforced kickstand and handle
Cons
- Requires compatible Jackery power station (not included)
- Limited expandability without adapters
- Premium price per watt
#5 — ALLPOWERS 200W Foldable Portable Solar Panel Kit

The ALLPOWERS 200W Foldable Portable Solar Panel Kit is a lightweight, budget-friendly solution for portable solar power. Compatible with most 12V batteries and solar generators, it’s perfect for travelers and campers seeking flexible, off-grid energy.
Key Specifications
- Wattage: 200 W monocrystalline
- Controller: Optional / separate purchase
- Output Voltage: 18 V
- Design: Foldable with fabric carry handle
- Weight: ~11 lbs
- Best For: Budget-conscious travelers & backup power
Pros
- Affordable compared to similar portable panels
- Compact and lightweight for easy transport
- Includes multiple connectors (MC4, DC, Anderson)
- Works with most solar generators (EcoFlow, Bluetti, Jackery, etc.)
- Weather-resistant ETFE coating for durability
Cons
- Build quality may vary between batches
- Controller not always included
- Not ideal for full-time, high-load RV systems
Side-by-Side Comparison Table
Below is a CMS-ready HTML table you can paste into your post. It uses the five products we covered and contains approximate, publish-ready specs — verify the live product pages before publishing (prices and some specs can change).
| Product | Wattage | Panel Type | Controller Included (Yes/No + type) | Best for | Estimated Weight | Approx Price Range | Link |
|---|---|---|---|---|---|---|---|
| Renogy 200W 12V Starter Kit (2×100W) | 200 W | Monocrystalline | Often includes 30A PWM (varies by SKU) | Rookie installers, small/mid RVs | ~54 lbs (total panels ≈ 2×27 lbs) | $300–$500 | Amazon |
| Renogy 400W 12V Premium Kit (4×100W + MPPT) | 400 W | Monocrystalline | 40A MPPT included | Full-time RVers, higher daily loads | ~54 lbs (panels only) | $800–$1,200 | Amazon |
| Zamp Legacy Series 180W Portable Kit | 180 W | Monocrystalline | Integrated 15A controller (built-in) | Portable use, renters, seasonal boondocking | ~40 lbs (case included) | $900–$1,400 | Amazon |
| Jackery SolarSaga 200W | 200 W | Bifacial Monocrystalline | No (designed to pair with power stations) | Portable + power station users | ~17.5 lbs | $300–$700 | Amazon |
| ALLPOWERS 200W Foldable Kit | 200 W | Monocrystalline | Usually no (controller sold separately / some bundles include) | Budget portable power, backup charging | ~11–15 lbs | $200–$400 | Amazon |
| Notes: bifacial (Jackery SolarSaga) can capture reflected light for extra yield; Zamp includes an integrated controller/SAE plug aimed at RV compatibility; some Renogy SKUs come with PWM controllers — check SKU to confirm MPPT or PWM; ALLPOWERS models vary by batch — confirm included connectors and warranty. | |||||||
Performance & Typical Setups
Below are three realistic off-grid RV setups (Weekend boondocker, Part-time traveler, Full-time off-grid). Each shows daily energy targets, recommended kit(s) from our top five, battery and inverter sizing, and short justification. All numbers use careful step-by-step math so you can follow the logic and adapt to your actual usage.
Assumptions used across examples
-
Typical strong-sun “peak sun hours” = 5 hours/day (adjust for your location/time of year).
-
System derate (losses: wiring, controller, temperature, mismatch) ≈ 30%, so usable fraction ≈ 0.70.
-
Battery system voltage: 12 V (adjust if your build is 24 V).
-
LiFePO₄ usable depth-of-discharge (DoD) ≈ 80%; AGM usable DoD ≈ 50%.
-
Inverter sizing should exceed peak AC draw by 25–50%.
Weekend Boondocker — 200–300 Wh/day
Estimated daily energy need (example): 250 Wh/day.
Battery sizing (LiFePO₄ preferred):
-
Required usable battery energy = 250 Wh.
-
Because Li usable DoD ≈ 80% → required battery stored energy = 250 ÷ 0.80 = 312.5 Wh.
-
Convert to amp-hours at 12 V: 312.5 ÷ 12 = 26.0417 Ah.
-
Recommendation: one 12 V 50 Ah LiFePO₄ (≈600 Wh usable at 50 Ah? — check nominal capacity) or 12 V 100 Ah AGM only if cost constrained (but note AGM usable is lower and heavier). A single 50 Ah Li gives headroom and longer life.
Solar array sizing:
-
Panel watt requirement = daily Wh ÷ (peak sun hours × derate) = 250 ÷ (5 × 0.70) = 250 ÷ 3.5 = 71.4286 W.
-
Round up for practical margin → ~100–200 W recommended.
-
Suggested product(s): Renogy 200W kit (over-specing here speeds recharge) or Jackery SolarSaga 200W for portable convenience.
Inverter sizing:
-
If you only charge small devices and mostly run DC loads, a small inverter (300–600 W) is sufficient. Use 600 W inverter if you occasionally run a laptop or small AC devices.
Why this works: A small 200W panel can produce ~200 W × 5 sun hrs × 0.70 = 700 Wh of DC energy on a good day — more than enough to cover 250 Wh and recharge battery reserves quickly.
Who this is for: Weekend campers, tailgaters, or people who want low maintenance and occasional boondocking.
Part-Time Traveler — 400–800 Wh/day
Estimated daily energy need (example): 600 Wh/day (midpoint for part-time use).
Battery sizing (LiFePO₄):
-
Required usable battery energy = 600 Wh.
-
Required stored energy = 600 ÷ 0.80 = 750 Wh.
-
Convert to Ah at 12 V: 750 ÷ 12 = 62.5 Ah.
-
Recommendation: 12 V 100 Ah LiFePO₄ (≈1,200 Wh nominal, ~960 Wh usable at 80% DoD) — this gives day-to-day headroom and allows some cloudy days.
Solar array sizing:
-
Panel watt requirement = 600 ÷ (5 × 0.70) = 600 ÷ 3.5 = 171.4286 W.
-
Round up → ~200–400 W recommended to provide reliable recharge and some margin.
-
Suggested product(s): Renogy 200W + Jackery 200W hybrid (rooftop + portable), or the Renogy 400W kit if roof space allows and you want faster recharge and less reliance on orientation.
Inverter sizing:
-
If you occasionally run AC appliances (microwave, small A/C intermittently), pick an inverter sized for your peak load. Typical recommendation: 1,500 W inverter covers most small household appliances; choose 25–50% headroom above anticipated surge loads.
Why this works: A 400 W rooftop array (400 W × 5 × 0.70 = 1,400 Wh/day) comfortably covers a 600 Wh/day demand, even with cloud variability, and quickly tops batteries for overnight usage.
Who this is for: Weekend warriors who stay multiple days, part-time travelers running moderate electronics, or those who want fridge + lights + occasional AC.
Full-Time Off-Grid — 1,000+ Wh/day
Estimated daily energy need (example): 1,500 Wh/day (a practical target for a modest full-timer with fridge, fans, laptops, and some AC use).
Battery sizing (LiFePO₄ recommended):
-
Required usable battery energy = 1,500 Wh.
-
Required stored energy = 1,500 ÷ 0.80 = 1,875 Wh.
-
Convert to Ah at 12 V: 1,875 ÷ 12 = 156.25 Ah.
-
For multi-day autonomy (2–3 cloudy days), multiply by days of autonomy (e.g., ×2 → 312.5 Ah).
-
Recommendation: 12 V 300–400 Ah LiFePO₄ bank or move to 24 V / 48 V architecture with equivalent capacity for efficiency and smaller wiring.
Solar array sizing:
-
Panel watt requirement = 1,500 ÷ (5 × 0.70) = 1,500 ÷ 3.5 = 428.5714 W.
-
Round up for margin and cloudy days → ~600–800 W recommended for reliable full-time living, or at minimum a 400–600 W rooftop array plus portable panels for topping off.
-
Suggested product(s): Renogy 400W kit as a foundation, plus an extra 200–400 W portable array (Jackery or ALLPOWERS) for supplementing when parked or to increase harvest seasonally.
Inverter sizing:
-
Full-time rigs often need a 2,000–3,000 W inverter to support AC loads and startup surges (fridge, microwave, A/C). Choose inverter with good surge rating and 25–50% headroom.
Generator backup:
-
For multi-day cloudy stretches or heavy AC loads, keep a generator (2–4 kW) as emergency backup. It’s also useful to bulk-charge batteries quickly when needed.
Why this works: A 600–800 W effective array (600 W × 5 × 0.70 = 2,100 Wh/day) supplies the 1,500 Wh target with margin for inefficiencies and cloudy days, while a large LiFePO₄ battery bank provides needed autonomy and longevity.
Who this is for: Full-time off-grid RVers or those with higher daily consumption (extensive electronics, small A/C use, frequent fridge cycling) who want true independence from hookups.
Shading, Orientation & Why MPPT Helps
Shading: Even partial shade on one cell or panel can dramatically reduce an entire panel’s output if panels are wired in series. To mitigate:
-
Wire some panels in parallel or create multiple series strings tied to MPPT inputs (if your controller supports it).
-
Keep panels clear of vent shadows, satellite dishes, and nearby trees.
-
Use bypass diodes and microinverters (rare for RVs) or separate MPPT controllers for different panel groups.
Orientation & Tilt:
-
Fixed roof panels are optimized for general all-day performance; if you can, park with the RV side facing the sun during multi-day stays.
-
Portable panels let you maximize angle toward the sun — tilt boosts yield significantly in low-angle sun (spring/fall, higher latitudes).
MPPT advantages:
-
MPPT controllers track the panel’s maximum power point and convert higher-voltage, lower-current panel output down to the battery voltage while increasing charge current.
-
In partial shade, cold temperatures, or when panel voltage doesn’t match battery voltage perfectly, MPPT can extract ~20–30% more usable energy than PWM.
-
MPPT also allows higher-voltage arrays (more panels in series) which reduces system current and wiring losses — useful for larger RV arrays.
Quick Practical Tips
-
If roof space is tight, prioritize monocrystalline panels for the highest watts-per-square-foot.
-
Consider a hybrid approach: a small permanent rooftop array for baseline charging and a portable panel (Jackery or Zamp) for topping up when parked facing the sun.
-
Always size the controller to support future expansion (e.g., choose a 40A MPPT if you might add panels later).
-
Confirm all weights, dimensions, and included hardware from product pages and your RV layout before buying or drilling holes.
Installation Basics — Roof & Portable
Installing your RV solar kit can be a straightforward DIY project if you follow safe practices and plan carefully. Whether you choose a permanent rooftop system or a portable/foldable setup, correct installation ensures maximum efficiency and safety.
Rooftop Installation Basics
Rooftop panels are ideal for full-timers or RVers who want constant power generation while driving or parked.
Mounting Options:
-
Z-Brackets: The most common mounting method. They secure panels directly to the roof surface and work well for flat or slightly curved roofs.
-
Adhesive Mounts: Great for fiberglass or metal roofs when you want to avoid drilling holes. Always use UV-resistant adhesive and prep surfaces thoroughly.
-
Rail Systems: Provide better airflow under panels and allow tilt adjustments for better solar exposure. Perfect for large arrays or aluminum roofs.
Sealing & Roof Penetrations:
When drilling holes for screws or wiring, seal every penetration with high-quality butyl tape and UV-rated lap sealant (e.g., Dicor). This prevents leaks that could cause long-term water damage.
Wiring Pathway:
-
Route cables from panels through a cable gland or roof entry plate into the RV.
-
Use UV-resistant MC4 connectors and 10–12 AWG solar cable.
-
Connect the wiring to your charge controller, ideally mounted near the batteries to minimize voltage drop.
-
From the controller, connect to the battery and inverter using properly fused leads.
Fuse Placement:
-
Install an inline fuse or circuit breaker between panels and the charge controller, and another between the controller and battery.
-
For a 12V system, use fuses rated 1.25× to 1.5× the panel current.
-
Include a master disconnect switch near the battery bank for safety and easy maintenance.
Portable / Foldable Panel Setup
Portable panels offer flexibility and easy deployment without roof modifications.
Placement & Angle:
-
Position panels toward the sun’s strongest direction (south in the northern hemisphere).
-
Use the adjustable kickstand to achieve a 30–45° tilt angle for maximum output.
-
Move panels occasionally throughout the day to follow the sun.
Avoiding Theft:
-
Use a locking cable or security chain to secure panels when left unattended.
-
When possible, park your RV so panels face the sun but remain visible to you.
Cable Routing:
-
Run cables neatly along the ground or under the RV to avoid tripping or pinching.
-
For power stations (like Jackery or ALLPOWERS), connect directly via MC4 or DC connectors.
-
For direct battery charging, always include a charge controller in between to prevent overcharging.
Safety Checklist
✅ Always disconnect batteries before wiring.
✅ Use proper gauge wire for your system’s current (check manufacturer’s recommendations).
✅ Protect all connections from moisture and abrasion.
✅ Double-check polarity before connecting to avoid damaging your controller or inverter.
✅ Fuse every major connection to prevent shorts and fire hazards.
When to Hire a Pro
If your setup involves:
-
Drilling into the roof or chassis,
-
Running wires through walls or into the RV’s electrical panel, or
-
Combining solar with alternator or shore power charging systems,
…it’s best to hire a certified RV electrician or solar installer. They’ll ensure your installation meets both RVIA and electrical safety standards, saving costly mistakes in the long run.
Maintenance & Troubleshooting
Solar panels are low-maintenance, but periodic checks keep them running efficiently.
Routine Maintenance
-
Cleaning: Wash panels every 1–2 months with soft water and a non-abrasive cloth. Dust, bird droppings, and tree sap can cut output by 10–20%.
-
Connection Check: Inspect wiring and connectors for corrosion, loose fittings, or insulation cracks.
-
Controller Logs: Many MPPT/PWM controllers store voltage, current, and fault codes — check these monthly for irregularities.
-
Battery Inspection: Ensure battery terminals are clean and tight; monitor voltage to avoid deep discharges.
-
Seasonal Adjustments: Adjust tilt angles or reposition portable panels seasonally for best exposure.
Quick Troubleshooting Table
| Symptom | Likely Cause | Quick Fix |
|---|---|---|
| Low power output | Dirty panels / shading | Clean panels, check shadows, reposition RV |
| Battery not charging | Blown fuse or loose wire | Replace fuse, tighten connections |
| Controller not turning on | Reversed polarity or bad ground | Check polarity and secure ground wire |
| Voltage fluctuating | Loose MC4 connectors | Reseat connectors firmly |
| Sudden 0W reading | Controller overload or panel disconnected | Reset controller, check wiring continuity |
Tip:
Keep a small multimeter and MC4 wrench in your RV toolkit. These two tools solve 80% of minor solar system issues on the road.
Cost Breakdown & ROI
Going solar requires upfront investment but pays off through energy independence and reduced campground fees.
Typical Upfront Costs
| Component | Approx. Cost Range |
|---|---|
| Solar panels (200–400W) | $300–$1,000 |
| Charge controller (PWM or MPPT) | $50–$250 |
| Inverter (1,000–3,000W) | $150–$500 |
| Battery (100Ah LiFePO₄) | $300–$700 |
| Wiring, fuses, mounts, accessories | $100–$250 |
| Labor (if hired) | $200–$800 |
Total DIY system cost: ~$700–$1,800
Professional install: ~$1,200–$3,000
ROI Example
Let’s say you invest $1,200 in a solar system.
You typically spend $25/night for electric hookups at campgrounds.
If you boondock 100 nights a year:
100 × $25 = $2,500 saved annually.
Your solar setup pays for itself in under one year, while continuing to provide free, quiet power for years afterward.
Financing & Incentives
-
Some states/countries offer solar tax credits (up to 30% in the U.S. for certain systems — check current IRS guidelines).
-
RV solar installations may qualify if the RV is classified as a primary or secondary residence.
-
Portable kits may not qualify but still yield long-term savings and energy security.
Always verify local incentives or utility rebates before purchasing.
Frequently Asked Questions
How many watts do I need to live off-grid in an RV?
Most full-time off-grid RV setups need 400–800W of solar and a 200–400Ah battery bank. This supports daily essentials like lights, fridge, fans, and electronics. To choose the best solar panel kits for RVs, calculate your average daily energy usage (in Wh) and match it with your panel’s daily output.
Can I run an RV fridge on solar alone?
Yes, but it depends on your fridge type and total panel output. A 12V compressor fridge may draw ~60–100Ah/day, so at least 400–600W of solar and a 200Ah LiFePO₄ battery are recommended for consistent operation.
Is MPPT worth it?
Absolutely. MPPT controllers increase efficiency by up to 30%, especially in cloudy or variable sunlight. They’re well worth the upgrade for systems above 200W.
Can I mix different panel brands or voltages?
Only if the voltage and current ratings are compatible. Mixing panels of different specs can cause performance drops. Use identical panels in each series string for best results.
What batteries are best for solar in RVs?
LiFePO₄ batteries are ideal — lightweight, long-lasting, and efficient. AGM or Gel can work for budget builds but weigh more and offer fewer cycles.
Can I install panels myself?
Yes, many RV owners DIY their installations. If you’re handy with wiring and follow safety protocols, it’s a doable weekend project. However, for complex systems (alternator integration, chassis bonding, or inverter-charger setups), professional help is recommended.
Final Recommendation + Quick Buying Checklist
If you’ve read this far, you’re ready to go solar confidently. Here’s how to choose the best solar panel kit for your RV based on your lifestyle:
Best Pick by Use Case:
-
Starter / Budget: Renogy 200W 12V Starter Kit — reliable, simple, expandable.
-
Full-Time Setup: Renogy 400W 12V Premium Kit — high output, MPPT included.
-
Portable Setup: Zamp 180W Portable Kit — plug-and-play convenience.
-
Lightweight Travel: Jackery SolarSaga 200W — perfect for portable stations.
-
Budget Portable Option: ALLPOWERS 200W Foldable Kit — affordable and flexible.
Quick Buying Checklist ✅
-
Calculate your daily energy consumption (Wh/day).
-
Match solar wattage to daily energy needs (consider 30% losses).
-
Choose MPPT controller if over 200W system.
-
Pick battery type (LiFePO₄ recommended).
-
Verify panel dimensions fit your RV roof or storage area.
-
Include fuses, breakers, and disconnect switches in design.
-
Check warranty, expandability, and connector types.
-
Confirm installation tools and sealant are ready.
Solar energy gives RV owners true independence — no generators, no hookups, just quiet, renewable power wherever the road leads. With the right system, you can explore farther, stay longer, and live comfortably off the grid year-round. 🌞🚐
Read More: Best Foldable Solar Panels for Overlanding